Workflows

From first enquiry to signed‑off remedials.

FireDoor Suite is a fire door inspection app that maps onto the way your team already works.

Start by quoting and scheduling an inspection, then let the platform carry everything through remedial quotes, RAMs, remedials, invoices, and client updates.

  • One joined‑up workflow from first enquiry to payment.
  • No re‑typing between inspections, quotes, remedials, and invoices.
  • Door‑by‑door audit trail ready for regulators and clients.

Today’s fire door workflow

FireDoor Suite workflow from inspections through quotes, remedials, installs and billing. Click to enlarge

A typical FireDoor Suite workflow

Use one continuous workflow instead of separate tools for surveys, quotes, remedials, and billing.

Step 1

Capture inspections on site

Log every opening with photos, fail reasons, and locations as you walk the building.

  • Set up inspections with clear scope, access notes, and floorplans before anyone leaves the office.
  • Use tablet‑friendly forms and statuses so the team can see what is scheduled, in progress, and completed.

Step 2

Turn findings into quotes & RAMs

Build quotes and RAMs directly from inspection data without re‑typing anything.

  • Pull in failed components and doors instead of starting quotes from a blank spreadsheet.
  • Apply your pricing presets and RAM templates so every document looks consistent.

Step 3

Schedule remedials and installs

Assign crews, plan days, and keep a live view of upcoming work.

  • Group accepted work into remedial projects with clear priorities and deadlines.
  • Use the shared calendar so office and site teams see the same plan.

Step 4

Share reports & get paid

Publish reports and invoices to the client portal and get paid faster.

  • Share inspection PDFs, RAMs, quotes, and invoices from one place instead of email threads.
  • Use Pay now links via Stripe so clients can pay online and you keep the audit trail intact.

Workflow 1 of 4

Workflow 1: Prepare and run inspections

Take one inspection from booking through to a finished report, using doors as the thread that ties everything together.

Outcome: one clean, door‑by‑door inspection record you can reuse for quotes, remedials, and audits.

Step 1

Set up the inspection

Pick the client and property, then add dates, access notes, and any reference photos or floorplans so inspectors know what to expect on site.

  • Confirm which buildings and blocks are in scope and who will be on site.
  • Add any special access, security, or sequencing notes so there are no surprises on the day.

Step 2

Walk each door on site

Add a door per opening, record components and fail reasons as you walk, and attach photos and severity so remedials can be prioritised later.

QR/NFC tags, floorplan pinning, and bulk label PDFs keep door identity consistent →

  • Capture location, tags, and severity for each failed component so it is easy to sort and filter later.
  • Use photos and notes to give enough context that office teams do not need to chase for detail.

Step 3

Complete and hand over

Mark the inspection as completed, review findings, and make sure every door is ready to feed into quotes, RAMs, and remedials.

  • Check for any missing doors or photos before you leave the building.
  • Move the inspection to completed so downstream workflows can start immediately.

See the inspections module →

Try this in your trial
  • Pick one real building you plan to inspect this month and create a test inspection with a handful of sample doors.
  • Walk at least 10–20 openings, then review findings with your team to spot tweaks to your current process.

Why it matters: you keep a clear door‑by‑door record for BS 8214 / BS 9999 checks without rebuilding the story in spreadsheets.

Workflow 2 of 4

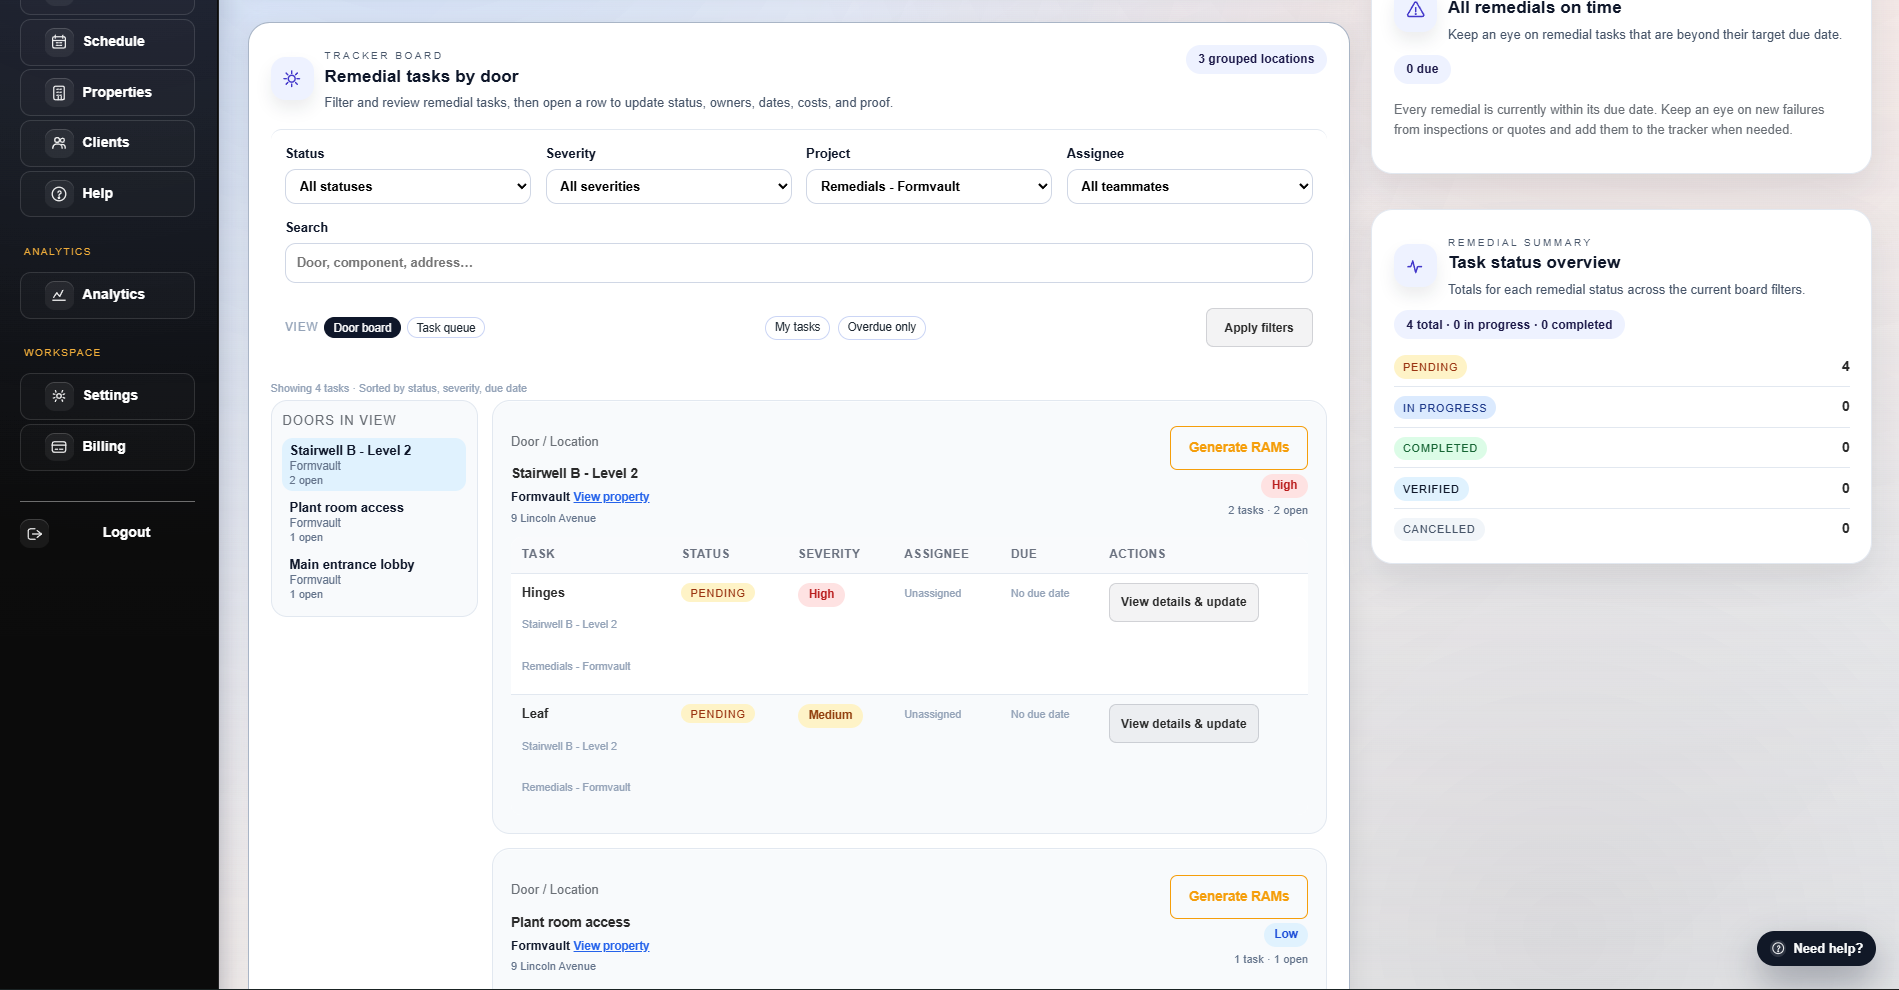
Workflow 2: From fails to quotes & RAMs

Turn completed inspections and remedial projects into clear commercial paperwork without rebuilding the story in spreadsheets.

Outcome: quotes and RAMs that match inspection evidence without spreadsheet rebuilds.

Step 1

Choose what you are pricing

Open the quotes area, pick a completed inspection or remedial project, and pull in the doors and tasks so you are not starting from a blank spreadsheet.

  • Filter by client, site, and inspection so only relevant doors and tasks appear in the quote builder.
  • Choose which remedial tasks to include so scope and pricing stay aligned.

Step 2

Shape the quote and RAMs

Adjust line items with your pricing presets and attach RAMs so the paperwork matches how the work will actually be delivered.

  • Use inspection‑linked pricing presets so common tasks are priced consistently.
  • Attach RAMs templates that match the type of work and site, not generic boilerplate.

Step 3

Share with the client

Send or download quote and RAM PDFs from one place, and keep statuses updated as clients review and approve.

  • Share quotes through the portal or by email with a single, consistent layout.
  • Track whether quotes are pending, accepted, or declined so the team knows what to schedule next.

See the Fire Door builder →

Try this in your trial
  • Use a completed test inspection to build an inspection quote and remedial quote from real doors and fails.
  • Generate quote and RAM PDFs and compare them to your current templates for clarity and detail.

Why it matters: your commercial paperwork matches the inspection evidence, making audits and client reviews much easier.

Workflow 3 of 4

Workflow 3: Turn accepted quotes into remedials

Move from approved work to organised projects, scheduled visits, and a clear record of what has been fixed.

Outcome: every remedial task tracked from quote to completion at door level.

Reminders & in‑app notifications reduce chasing between visits and sign‑off →

Step 1

Create remedial projects

Convert accepted quotes and failed components into remedial tasks so each action keeps its door, property, and severity.

  • Pull remedial tasks directly from accepted quotes so nothing is missed between pricing and delivery.
  • Group related tasks into projects so teams can work building‑by‑building or block‑by‑block.

Step 2

Assign and schedule work

Group tasks into projects, assign crews, and use the shared calendar to plan visits while keeping office and site teams in sync.

Schedule intelligence helps handle conflicts and balance team load →

  • Assign work to specific crews and days, taking into account access, risk, and dependencies.
  • Keep a live board of what is scheduled, on site, and waiting for sign‑off.

Step 3

Close out and plan reinspections

Track status by door and by project, mark work as signed off, and schedule follow‑up inspections where needed so nothing is left unresolved.

  • Record completion evidence at door level so audits and reinspections start from a clear baseline.
  • Plan reinspections for high‑risk doors or sites where new issues have been reported.

Explore remedials & scheduling →

How this workflow changes your remedials process:

Before FireDoor
With FireDoor workflow
From inspection to remedial list
Inspectors email or upload lists of issues, then office teams re‑type them into spreadsheets and job sheets.
Failed components become remedial tasks directly from inspections and quotes, already grouped by door and severity.
Planning and scheduling work
Jobs are planned in separate calendars and boards, so it’s hard to see which doors are still outstanding.
Projects, tasks, and calendar all point back to the same doors, so you can see what’s scheduled, on‑site, and signed off at a glance.
Proving what was fixed
Evidence of remedials lives across folders of photos, spreadsheets, and emails when audits land.
Each door shows its inspection findings, remedial tasks, and completion evidence in one place, ready for clients and auditors.
Try this in your trial

Convert one accepted quote into a remedial project, schedule a small visit, and walk it through to sign‑off so you can see this flow in action.

Why it matters: you can prove exactly which doors were fixed, when, and by whom if regulators or clients ask.

Workflow 4 of 4

Workflow 4: Share the portal and get paid

Use the client portal and Stripe Pay now links to keep communication, documents, and payments in one joined‑up flow.

Outcome: fewer email chains for clients and faster, traceable payments.

Portal compliance exports (CSV/PDF) and issue reporting for clients →

Step 1

Invite clients into the portal

Give key contacts access so they can see their properties, inspections, quotes, invoices, and reported issues in one place.

  • Invite clients from the workspace so access is controlled per organisation.
  • Let portal users see only the buildings, reports, and invoices that belong to them.

Step 2

Share reports, RAMs, and invoices

Publish inspection PDFs, RAMs, quotes, and invoices so clients can self‑serve documents without email chains.

  • Give clients a single place to download reports instead of forwarding attachments.
  • Highlight which reports and invoices are new since they last logged in.

Step 3

Take payment and keep the audit trail

Use Pay now links via Stripe for faster payment, while keeping a clear chain from inspection to remedials, quotes, invoices, and revenue.

  • Include Pay now buttons on invoices so payments land in your Stripe account without extra admin.
  • Keep every invoice linked back to its quote, remedials, and inspection so finance and operations stay aligned.

See documents & PDFs → · See billing & client portal →

Try this in your trial
  • Invite one trusted client contact into the portal on a test or low‑risk project and publish at least one report and invoice.
  • Send a test invoice with a Pay now link (or a low‑value live invoice) so you can see how Stripe payments flow end to end.

Why it matters: clients get faster answers and you keep a complete audit and revenue trail from inspection through to payment.

Workflows for different teams

FireDoor Suite adapts to contractors, housing providers, and FM teams without forcing a new way of working.

Contractors & installers

Move from survey to quote to remedial programme in one place, with site teams seeing exactly what needs doing.

Housing & landlords

Keep a clear trail of inspections, issues, and remedials by block so you can evidence compliance quickly.

FM & maintenance teams

Blend planned inspections with day‑to‑day remedials and prove what’s been completed across your portfolio.

Consultants & fire engineers

Capture detailed inspections and hand structured findings to contractors without losing detail in the handover.

Workflow questions teams often ask

Quick answers on how to use FireDoor Suite alongside your existing tools and where to start during a trial.

Do we have to use every workflow?

No. Many teams start with inspections and quotes first, then layer in remedials, the portal, and billing once the basics are working well.

Can we start with just inspections?

Yes. You can use FireDoor Suite just for inspections and reports to begin with, then switch on quoting, remedials, and portal access when the team is ready.

What if some work still runs in spreadsheets?

That’s fine. Many teams keep legacy jobs in spreadsheets while new work runs end‑to‑end in FireDoor Suite, then gradually move more of the workflow across.

What happens to our workflow after the trial?

Your data stays in place. If you continue, you keep working from the same inspections, quotes, remedials, and portal logins; if you stop, you can export key reports first.

Need more detail? Read the full FAQ →